Surgical Planning
In this assignment, you are tasked with developing a segmentation algorithm. Your goal is to segment the pelvis, lumbar vertebrae, intervertebral discs, and the spinal cord within a CT dataset.
Objective: Implement a region growing algorithm to perform the segmentation, following the guidelines provided in lectures.
Setup
Data Preparation: Transfer the
pelvis_ct.nii.gzfile from ILIAS todata/planning/pelvis_ct.nii.gz.Update Repository: Update your repository by running
git pull --autostash.Implementation File: The
segmentation.pyfile withinassignments/planning/directory contains a rough implementation. Complete the sections marked with## TODO:.def region_grow(image, seed_point): """ Performs a region growing on the image starting from 'seed_point' :param image: A 3D grayscale input image :param seed_point: The seed point for the algorithm :return: A 3D binary segmentation mask with the same dimensions as 'image' """ segmentation_mask = np.zeros(image.shape, np.bool_) z, y, x = seed_point intensity = image[z, y, x] print(f'Image data at position ({x}, {y}, {z}) has value {intensity}') print('Computing region growing...', end='', flush=True) ## TODO: choose a lower and upper threshold threshold_lower = intensity threshold_upper = intensity _segmentation_mask = (np.greater(image, threshold_lower) & np.less(image, threshold_upper)).astype(np.bool_) ## TODO: pre-process the segmented image with a morphological filter to_check = deque() to_check.append((z, y, x)) while to_check: z, y, x = to_check.popleft() if _segmentation_mask[z, y, x]: # Mark the current point as visited _segmentation_mask[z, y, x] = False segmentation_mask[z, y, x] = True # These for loops will visit all the neighbors of a voxel and see if # they belong to the region for dz in range(-1, 2): for dy in range(-1, 2): for dx in range(-1, 2): if dz == 0 and dy == 0 and dx == 0: continue # Skip the center point nz, ny, nx = z + dz, y + dy, x + dx ## TODO: implement the code which checks whether the current ## voxel (nz, ny, nx) belongs to the region or not ## OPTIONAL TODO: implement a stop criteria such that the algorithm ## doesn't check voxels which are too far away # Post-process the image with a morphological filter structure = np.ones((3, 3, 3)) segmentation_mask = ndimage.binary_closing(segmentation_mask, structure=structure).astype(np.bool_) print('\rComputing region growing... [DONE]', flush=True) return segmentation_mask
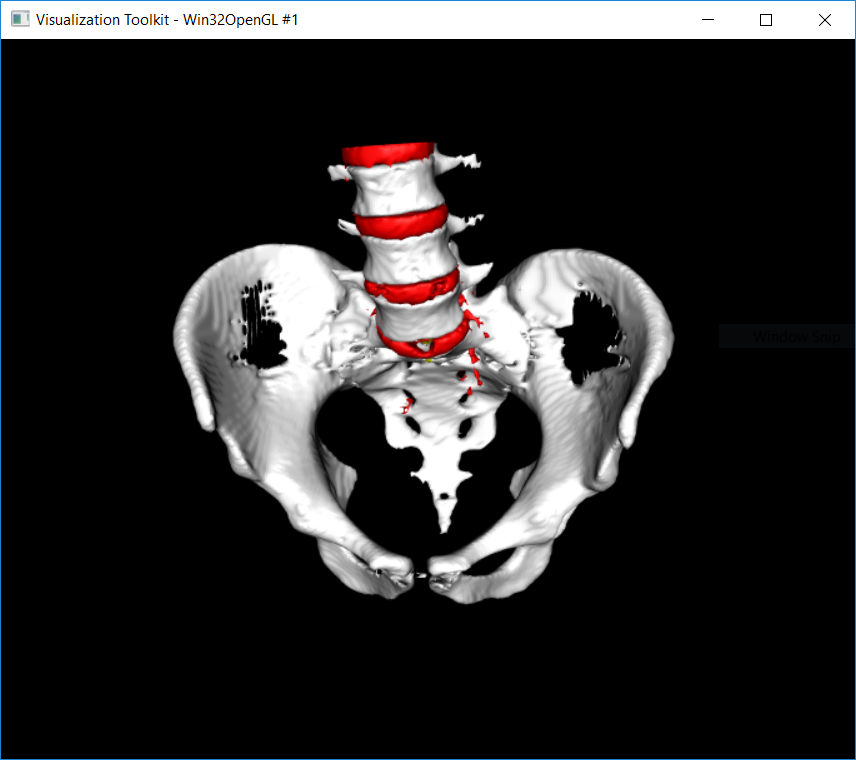
Execution: Run your segmentation script via
python cas/planning/planning.pyto segment the specified structures. The segmentation does not need to be perfect, but the structures should be separated (see the 3D view above).
Testing your algorithm
Execute the planning.py script to test your algorithm. Use keyboard shortcuts to interact with the application, perform segmentation by clicking (several times), and save your work.
The script opens a window with a CT scan of a pelvis and spine model. The following keyboard shortcuts are available:
1-4select active label. The segmented region (output of your algorithm) will then be labelled with the active label:None (default)
Spinal cord
Vertebrae
Pelvis
Discs
clickto start the region growing segmentation at the cursor position (seed point)spacetoggle segmentation mask overlayuporscrollmove slice updownorscrollmove slice downvvisualise the resulting 3D surface models for the current segmentation maskrreset segmentation mask to zerossave segmentation mask to diskqquit (without saving)
Saving the output
Save the completed segmentation to disk using the
skey.Verify the saved segmentation mask by running the script
show3d.pyfor a 3D visualisation:python cas/planning/show3d.py. The script will load and display the segmentation saved to disk.Create and save a screenshot of the 3D segmented models.
Code Submission
Submit a ZIP file named lastname_firstname_assignment1.zip on ILIAS containing:
The modified
segmentation.pyaslastname_firstname_assignment1_code.py.Console output in a text file named
lastname_firstname_assignment1_output.txt.A screenshot of the 3D segmented model as
lastname_firstname_assignment1_screenshot.png.
Online Questions
Complete the “Assignment 1 - Questions” on ILIAS:
Answer all questions.
Each question has only one correct answer.
All questions are equally weighted. Incorrect answers will not result in point deductions.
You are allowed only one attempt to complete the test.
Assignment Evaluation
This assignment constitutes 25% of your total assignment grade, split equally between:
Code Evaluation (50%): points are awarded as follows:
4 points for a working solution.
3 points for only small errors.
2 points for a substantial effort.
1 point for substantial errors or minimal effort.
0 points for no attempt or plagiarism.
Online questions (50%)